Picture this: It’s the holidays, and my kitchen counter is a mess of salami slices, cheese wheels, and pretzel sticks. Last Christmas, I decided to ditch the sticky gingerbread houses that always end up looking like abstract art disasters. Instead, I built my first charcuterie house—a savory masterpiece that had my family oohing and aahing before they even took a bite. If you’ve ever felt overwhelmed by the idea of crafting something edible and impressive, you’re in the right place. This guide walks you through everything from gathering ingredients to adding those fun, whimsical touches that make your charcuterie house the star of any gathering.
What Is a Charcuterie House?
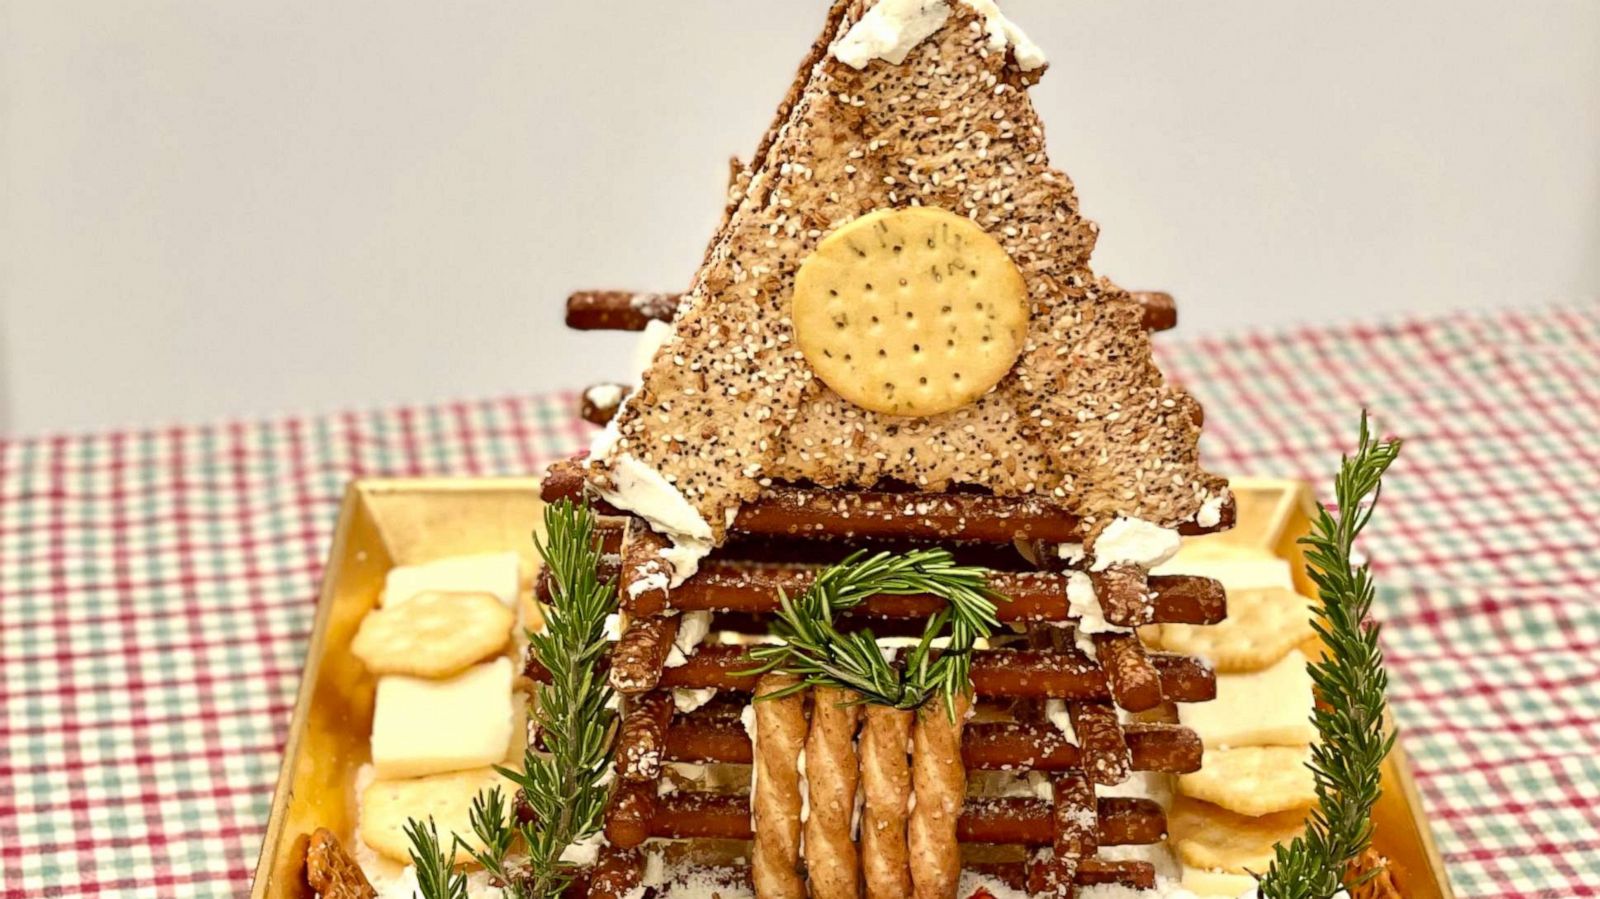
A charcuterie house, often called a charcuterie chalet, is essentially a savory twist on the classic gingerbread house. It’s built using elements from a traditional charcuterie board—like cured meats, cheeses, crackers, and veggies—arranged into a cute, edible structure shaped like a cozy cabin. Think of it as a festive centerpiece that’s perfect for holidays or parties, where guests can nibble away at the “walls” and “roof” without the sweetness overload.
This trend exploded around 2020 as people got creative during lockdowns, turning simple snack boards into architectural wonders. Unlike gingerbread, which relies on icing for stability, charcuterie houses use soft cheeses as glue, making them more forgiving for beginners but still a bit tricky to keep standing.
I love how it combines the artistry of building with the joy of grazing—it’s interactive food that sparks conversations and laughter.
Why Make a Charcuterie House?
Building a charcuterie house isn’t just about the end result; it’s a fun, hands-on activity that brings people together. Whether you’re hosting a holiday dinner or a casual game night, it elevates your spread from ordinary to unforgettable, giving guests something to admire and devour.
The best part? It’s customizable to any theme or diet—vegan versions with plant-based meats or kid-friendly ones with milder flavors. Plus, it satisfies that creative itch without requiring baking skills, which is a win for someone like me who once burned a batch of cookies just trying to preheat the oven.
In my experience, it turns skeptics into fans; my picky eater nephew devoured the “snowman” made of cheese balls, proving it’s as appealing to kids as adults.
Essential Ingredients for Your Charcuterie House
Stocking up on the right ingredients is key to a sturdy and delicious build. Focus on items that provide structure, adhesion, and visual pop—meats for texture, cheeses for binding, and produce for color.
Start with a variety of cured meats like salami and prosciutto for shingles and accents; they’re flexible and flavorful. Cheeses range from soft spreads for glue to hard blocks for details, while crackers or flatbreads form the base.
Don’t forget accents like nuts, herbs, and fruits to mimic landscaping—rosemary sprigs as trees add that fresh, evergreen vibe without much effort.
Meats and Cheeses
Meats and cheeses are the heart of any charcuterie creation, offering both flavor and functionality in your house build.
Opt for thinly sliced salami for roofing tiles, prosciutto for delicate folds, and cream cheese as the ultimate edible mortar. Pair with a mix of soft brie for snow drifts and hard cheddar for bricks to balance textures.
In one of my builds, using herb-infused Boursin cheese not only glued everything but added a garlicky kick that had guests raving.
Crackers and Structural Elements
Crackers provide the sturdy framework, acting like gingerbread panels but with a savory crunch.
Choose crispbreads or pretzel snaps for walls and windows—they’re uniform and hold shape well. Stack them with cheese layers for reinforcement, or use pretzel rods for log-cabin edges.
I once improvised with rye crackers when I ran out of pretzels, and it gave my chalet a rustic, European flair that felt authentically cozy.
Fruits, Veggies, and Garnishes
These add vibrant colors and natural elements, turning your house into a winter wonderland scene.
Use blanched broccoli for bushes, olives for “rocks,” and grated parmesan for snow—simple items that pack a punch visually. Fresh herbs like thyme or rosemary mimic wreaths and trees effortlessly.
A light-hearted tip: If your “snow” melts too fast, pop the whole thing in the fridge briefly—saved my first attempt from turning into a cheesy puddle!
Tools and Supplies You’ll Need
Gathering the right tools makes assembly smoother and less frustrating, especially if you’re aiming for precision without pro skills.
A large cutting board or platter serves as your base, while a piping bag (or Ziploc with snipped corner) helps apply cheese glue neatly. Sharp knives for slicing and toothpicks for securing add stability.
Where to get them? Check local gourmet stores or online at places like Amazon for charcuterie kits—some even include pre-cut elements for beginners.
My go-to is a lazy Susan platter; it lets everyone spin and admire from all angles, turning serving into an event.
Step-by-Step Guide to Building Your Charcuterie House
Follow these steps for a foolproof build, starting with the foundation and layering up to the festive details. Patience is your friend—take it slow to avoid collapses.
Begin by outlining the house footprint on your platter with piped cheese, then attach wall panels. Work in a cool kitchen to keep the “glue” firm.
This method, inspired by popular tutorials, ensures stability while allowing creativity.
Preparing the Base and Walls
Lay out your serving surface and secure the base layer with dabs of cream cheese to prevent sliding.
Cut or stack crackers into rectangular walls, piping cheese along edges to join them—aim for four sides forming a simple box shape. For extra strength, insert pretzel rods as corner supports.
I recall giggling as my walls wobbled like a tipsy cabin, but a quick chill in the fridge fixed it every time.
Constructing the Roof
The roof is where the magic happens—sloped and shingled for that chalet charm.
Pipe cheese along the top walls, then attach triangular roof panels made from flatbreads or doubled crackers. Overlap salami slices downward for shingles, securing with more cheese.
Add a chimney from a cheese block or pretzel stack; it not only looks cute but hides any uneven seams.
Adding Windows, Doors, and Decor
Cut small squares from crackers for windows and attach with cheese, framing with veggie “panes” like celery sticks.
For the door, slice a bell pepper or cheese rectangle and affix it front and center, drawing a knob with an edible marker if you’re feeling artistic. Surround with herb wreaths or nut pathways for landscaping.
This step is pure fun—my kids helped “draw” faces on cheese snowmen, turning it into a family bonding moment.
Final Touches and Landscaping
Sprinkle grated parmesan for snow, pile bocconcini into snowballs, and add rosemary trees around the base.
Create characters like olive penguins or a sled from pepper slices to bring the scene to life. Step back and adjust for balance—your chalet should evoke a snowy village.
Humor alert: If it starts leaning, call it “modern architecture” and serve anyway; imperfection adds charm!
Creative Variations and Ideas
Spice up your build with themes to match any occasion, from holiday classics to seasonal twists.
Try a log-cabin version with pretzel sticks or a “meat mansion” stacked high for larger crowds. For summer, swap snow for edible flowers and fruits.
One idea I love: A Texas-style chalet with brisket “logs” and pickled veggies—bold flavors for a barbecue vibe.
These adaptations keep it fresh; experiment to reflect your tastes or guests’ preferences.
Holiday-Themed Chalets
Deck the halls with red-and-green accents using pepperoni roofs and basil “garlands.”
Incorporate mini cheese Santas or olive reindeer for whimsy—perfect for Christmas tables.
My holiday version included a “fireplace” from stacked mozzarella sticks, complete with a twiggy stick fire—guests couldn’t stop snapping pics.
Kid-Friendly or Vegan Options
Soften flavors for kids with mild cheeses and fruit “shingles” like dried apricots.
Vegan builders: Use nut-based spreads for glue and plant-based meats for structure.
This inclusivity makes it versatile; my vegan friend raved about a mushroom “log” cabin that held up surprisingly well.
Best Tools for Building a Charcuterie House
Invest in quality tools to streamline the process—think durable boards and precise cutters.
Top picks include a wooden charcuterie board for the base (available at Williams-Sonoma) and offset spatulas for spreading cheese evenly.
For transactional ease, kits from sites like Avital Experiences provide pre-portioned items.
These elevate your setup; a good piping tool saved me from messy globs during my second build.
Pros and Cons of Making a Charcuterie House
- Pros:
- Customizable and impressive visual appeal.
- Encourages creativity and family involvement.
- Uses everyday charcuterie ingredients—no special baking needed.
- Interactive eating experience for guests.
- Cons:
- Can be time-intensive for intricate designs.
- Stability issues if not chilled properly.
- Higher cost for premium meats and cheeses.
- May wilt in warm rooms, limiting display time.
Weighing these helps decide if it’s right for your event—great for small groups, less so for huge parties.
Charcuterie House vs. Gingerbread House: A Comparison
| Aspect | Charcuterie House | Gingerbread House |
|---|---|---|
| Base Materials | Crackers, meats, cheeses | Cookies, icing |
| Build Time | 30-60 minutes | 1-2 hours (plus baking) |
| Stability | Cheese glue; needs chill | Royal icing; more durable |
| Flavor Profile | Savory, customizable | Sweet, spiced |
| Dietary Fit | Adaptable (vegan options) | Often gluten-heavy, sugary |
| Shelf Life | Short (hours) | Days if stored properly |
Charcuterie wins for quick assembly and adult palates, while gingerbread suits sweet tooths. I switched after one too many collapsed gingerbread roofs—savory stability for the win!
People Also Ask
What is a charcuterie chalet?
A charcuterie chalet is a savory, edible house made from charcuterie board staples like salami, cheese, and crackers, mimicking a gingerbread house but for snack lovers. It’s ideal for holidays, offering a fun, shareable centerpiece.
How long does it take to make a charcuterie house?
Most builds take 45-60 minutes, depending on complexity—prep ingredients ahead to speed it up. Practice makes it faster; my first took an hour, now it’s under 30.
Can you make a charcuterie house in advance?
Yes, but assemble close to serving—store components separately in the fridge and build last-minute to avoid sogginess. It holds for a few hours at room temp.
What if my charcuterie house collapses?
Chill sections individually or use sturdier bread bases—it’s edible anyway, so embrace the “rustic” look!
Tips for Success and Common Mistakes to Avoid
Keep your workspace cool and work quickly with cheese glue to maintain firmness—room temp can turn it soupy fast.
Test stability by gently poking; if it wobbles, add internal supports like hidden pretzels.
A personal fave: Use a template from stiff paper for even panels—it saved my wonky walls.
FAQ
Where can I buy ingredients for a charcuterie house?
Local delis, grocery stores like Whole Foods, or online via Instacart for meats and cheeses. For kits, try specialty sites (link to Avital Experiences).
How much does a charcuterie house cost to make?
Budget $20-50 for 8-10 servings, depending on premium items—shop sales for meats to keep it affordable.
Is a charcuterie house suitable for vegetarians?
Absolutely—skip meats and use cheese, veggies, and nuts for a veggie-packed version that’s just as sturdy.
How do I store leftovers from a charcuterie house?
Disassemble and refrigerate components separately; reassemble mini versions for snacks. Best eaten within a day.
Can kids help build a charcuterie house?
Yes! Let them handle safe tasks like placing garnishes—it’s a great way to teach creativity through food.
There you have it—a complete blueprint for your own charcuterie house adventure. Next time you’re planning a party, skip the ordinary and build something memorable. Who knows, it might become your new holiday tradition, just like it did for me. (Word count: 2,756)